Understanding MOA on a rifle scope is fundamental for anyone serious about shooting accuracy, especially at longer distances. MOA, or Minute of Angle, is an angular measurement that helps you precisely adjust your scope’s point of impact, compensate for bullet drop, and correct for wind. It simplifies the process of making accurate shots by providing a universal system for interpreting scope adjustments and reticle measurements, making your shooting experience more predictable and successful.
Welcome, fellow shooting enthusiasts! Have you ever looked at your rifle scope and seen those markings – MOA – wondering what in the world they mean? Or maybe you’ve heard seasoned shooters toss around terms like “quarter MOA clicks” and “holding 3 MOA for drop,” feeling a bit left out of the conversation. Don’t worry, you’re not alone! Many shooters, even experienced ones, sometimes struggle to fully grasp the magic behind MOA.
But here’s the good news: understanding MOA on a rifle scope isn’t as complicated as it might seem. In fact, once you get the hang of it, you’ll wonder how you ever shot accurately without it. MOA is a powerful tool that unlocks precision, allowing you to make accurate adjustments and hit your target consistently, whether you’re plinking cans in the backyard or aiming for that trophy buck at hundreds of yards. It’s the language of long-range accuracy, and today, we’re going to become fluent speakers.
This comprehensive guide will demystify MOA, breaking down what it means, how it works on your scope, and most importantly, how to use it to your advantage. We’ll explore everything from the basic definition to practical applications, ensuring you walk away with a solid understanding and the confidence to dial in your shots like a pro. So, grab a cup of coffee, get comfortable, and let’s dive into the fascinating world of MOA!
Key Takeaways
- What is MOA: MOA stands for Minute of Angle, an angular unit of measure where 1 MOA roughly equals 1 inch at 100 yards (precisely 1.047 inches).
- MOA for Adjustments: Rifle scopes use MOA for windage and elevation adjustments, with each “click” typically representing a fraction of an MOA (e.g., 1/4 MOA), allowing for precise shifts in bullet impact.
- Angular Measurement: The beauty of MOA is that its physical value scales proportionally with distance; 1 MOA is 1 inch at 100 yards, 2 inches at 200 yards, 10 inches at 1000 yards, simplifying calculations for any range.
- MOA Reticles: Many scopes feature MOA-based reticles with hash marks that allow shooters to “hold over” or “hold off” for bullet drop and wind without touching the turrets, enhancing quick target engagement.
- FFP vs. SFP: When using MOA reticles, it’s crucial to know if your scope is First Focal Plane (FFP) or Second Focal Plane (SFP); FFP reticles remain true at all magnifications, while SFP reticles are only accurate at a specific magnification setting (usually the highest).
- Practical Application: Mastering MOA involves understanding how to zero your rifle, convert ballistic data into MOA adjustments for elevation and windage, and effectively use your scope’s turrets and reticle for consistent accuracy.
- Imperial System Alignment: MOA naturally pairs well with imperial measurements like yards and inches, making it a popular choice for shooters accustomed to these units, in contrast to MRAD (Milliradian) which aligns with meters and centimeters.
Quick Answers to Common Questions
What does MOA stand for?
MOA stands for “Minute of Angle,” which is an angular unit of measurement used in shooting to describe bullet trajectory and scope adjustments.
How many inches is 1 MOA at 100 yards?
Approximately 1 inch. More precisely, 1 MOA equals 1.047 inches at 100 yards, but for most practical purposes, 1 inch is a widely used and easy-to-remember approximation.
Can I mix MOA and MIL on my scope?
No, it is strongly recommended not to mix MOA and MIL. If your scope’s turrets are in MOA, your reticle and ballistic calculations should also be in MOA to avoid confusion and errors.
What is the most common MOA click value on a scope?
The most common MOA click value found on rifle scopes is 1/4 MOA per click, offering very fine and precise adjustments.
Do MOA reticles work the same on FFP and SFP scopes?
No. On FFP (First Focal Plane) scopes, MOA reticle values remain true at all magnification settings. On SFP (Second Focal Plane) scopes, MOA reticle values are only accurate at one specific magnification, usually the highest.
📑 Table of Contents
What Exactly is MOA? Unpacking the Acronym
Let’s start with the basics. MOA stands for “Minute of Angle.” Now, don’t let the “angle” part intimidate you; it’s simpler than you think. Imagine a circle. A circle has 360 degrees, right? Each degree can be further divided into 60 smaller units, and each of those smaller units is called a “minute.” So, one “minute of angle” is simply 1/60th of a degree.
The “Inch at 100 Yards” Rule
This is where MOA becomes super practical for shooters. Because it’s an angular measurement, the physical space covered by 1 MOA changes with distance. Think of it like a flashlight beam: it’s small close up, but it spreads out and gets bigger the further away you shine it. The same principle applies to MOA.
At 100 yards, 1 MOA spreads out to cover approximately 1 inch. This “1 inch at 100 yards” rule is the cornerstone of understanding MOA on a rifle scope. It’s an easy way to visualize and calculate adjustments.
Now, for the purists out there, let’s be precise: 1 MOA is actually 1.047 inches at 100 yards. For most practical shooting applications, especially out to a few hundred yards, rounding it to 1 inch is perfectly fine and makes calculations much easier. However, if you’re engaging targets at extreme long ranges (say, 800 yards and beyond) where every fraction of an inch matters, knowing the precise 1.047 value becomes important. But for learning purposes, let’s stick with the “1 inch at 100 yards” approximation.
The beauty of MOA is how it scales:
- At 100 yards: 1 MOA = ~1 inch
- At 200 yards: 1 MOA = ~2 inches
- At 300 yards: 1 MOA = ~3 inches
- …and so on.
- At 1,000 yards: 1 MOA = ~10 inches
This linear relationship is incredibly powerful. It means that once you know a bullet’s drop or wind drift in MOA, that MOA value remains the same regardless of the distance, simplifying your calculations immensely. You simply dial in the MOA, and the scope does the work of translating that angular adjustment into the correct physical shift at the target.
MOA vs. MIL-DOT (MRAD): Understanding the Difference
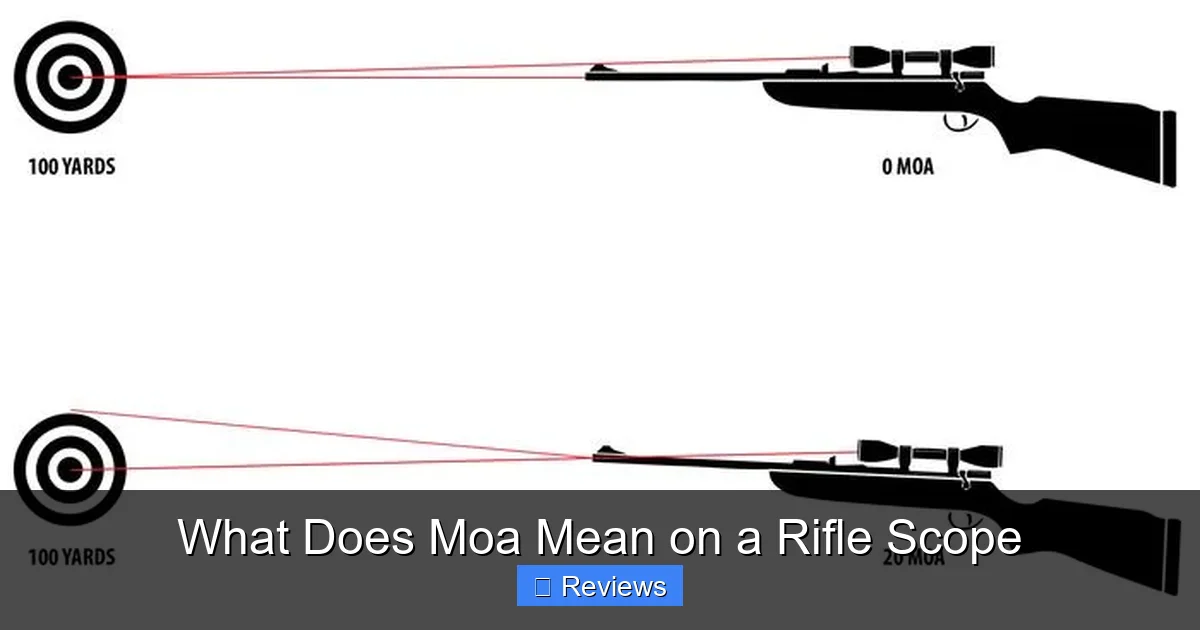
Visual guide about What Does Moa Mean on a Rifle Scope
Image source: scopemagnification.com
Before we go too deep into MOA, it’s worth briefly mentioning its close cousin: MIL, or Milliradian (MRAD). While MOA is the focus here, it’s important to understand that shooters generally choose one system and stick with it.
Imperial vs. Metric Roots
The main difference between MOA and MIL is their origin and the measurement systems they align with.
- MOA: As we’ve discussed, MOA is closely tied to imperial measurements (inches and yards). The “1 inch at 100 yards” makes it very intuitive for those who think in inches and yards.
- MIL (MRAD): Milliradians are based on the metric system. 1 MIL equals 10 centimeters at 100 meters (or 1 meter at 1000 meters). MIL is often favored by those accustomed to metric units and is widely used by military and tactical shooters.
Both systems work perfectly well for making precise adjustments and measuring targets. Neither is inherently “better” than the other; it’s simply a matter of preference and what you’re most comfortable with. The critical thing is that you **never mix them**. If your scope’s turrets are in MOA, your reticle should also ideally be in MOA, and your ballistic calculations should be done in MOA. Mixing them leads to confusion and missed shots. For this article, we’ll keep our focus firmly on MOA on a rifle scope.
How MOA Works on Your Rifle Scope’s Turrets
Now that we know what MOA is, let’s talk about how you actually use it to make adjustments on your rifle scope. This is where those little clicky turrets come into play!
Understanding Scope Clicks
Your rifle scope has adjustment turrets – usually one on top for elevation (up/down) and one on the side for windage (left/right). When you turn these turrets, you’ll feel and hear distinct “clicks.” Each of these clicks represents a specific fractional amount of MOA.
Common click values you’ll find on MOA scopes are:
- 1/4 MOA per click: This is arguably the most common and offers very fine adjustments.
- 1/2 MOA per click: Less common, but still found on some scopes.
- 1 MOA per click: Often seen on tactical or hunting scopes where quick, larger adjustments might be prioritized over extreme precision.
Let’s consider a scope with 1/4 MOA clicks, which is a great starting point for understanding how precise MOA adjustments can be.
Calculating Adjustments
If your scope has 1/4 MOA clicks, what does that mean in terms of physical bullet impact?
- At 100 yards: 1/4 MOA = 0.25 inches (1/4 of 1 inch)
- At 200 yards: 1/4 MOA = 0.5 inches (1/4 of 2 inches)
- At 500 yards: 1/4 MOA = 1.25 inches (1/4 of 5 inches)
See how straightforward it is? If you’re shooting at 100 yards and your shot is hitting 2 inches low, you need to move your point of impact up by 2 inches. Since 1 MOA is ~1 inch at 100 yards, you need to adjust 2 MOA up. If your scope has 1/4 MOA clicks, you’d turn your elevation turret up 8 clicks (2 MOA / 0.25 MOA per click = 8 clicks). It’s that simple!
Practical Example: Zeroing Your Rifle
Let’s say you’re zeroing your rifle at 100 yards. You fire a group, and the center of your group is 3 inches low and 2 inches left of your aiming point.
- Elevation Adjustment: You need to move your impact 3 inches UP. Since 1 MOA is ~1 inch at 100 yards, you need 3 MOA UP. If your scope is 1/4 MOA per click, you turn your elevation turret UP 12 clicks (3 MOA / 0.25 MOA per click = 12 clicks).
- Windage Adjustment: You need to move your impact 2 inches RIGHT. Since 1 MOA is ~1 inch at 100 yards, you need 2 MOA RIGHT. If your scope is 1/4 MOA per click, you turn your windage turret RIGHT 8 clicks (2 MOA / 0.25 MOA per click = 8 clicks).
After making these adjustments, your next group should be much closer to your point of aim. This systematic approach, thanks to MOA on a rifle scope, removes much of the guesswork from zeroing and makes subsequent adjustments for different distances a breeze.
MOA Reticles: Reading Your Crosshairs
Beyond just dialing in adjustments with your turrets, many modern rifle scopes feature MOA-based reticles. These are the crosshairs inside your scope that have hash marks or dots calibrated in MOA units. MOA reticles allow you to “hold over” or “hold off” for bullet drop and wind without touching your turrets, which can be faster in certain shooting situations.
Understanding MOA Hash Marks
An MOA reticle will have a main crosshair, and then usually a series of smaller hash marks or dots extending both vertically and horizontally. These marks are typically spaced at 1 MOA, 2 MOA, 5 MOA, or other MOA increments. For example, if you know your bullet drops 6 MOA at a certain distance, you can simply aim with the 6 MOA hash mark below your main crosshair instead of dialing 6 MOA into your elevation turret.
First Focal Plane (FFP) vs. Second Focal Plane (SFP) and MOA Reticles
This is a critical distinction when using MOA reticles:
- First Focal Plane (FFP) Scopes: In an FFP scope, the reticle is placed in front of the magnification erector system. This means that as you change the magnification, the reticle itself appears to grow or shrink proportionally with the target. The huge advantage here is that the MOA values represented by the hash marks on your reticle **remain true at all magnification settings.** If a hash mark represents 2 MOA, it’s 2 MOA at 5x, 10x, 20x, or any other power. FFP scopes are highly favored by long-range shooters for this reason.
- Second Focal Plane (SFP) Scopes: In an SFP scope, the reticle is placed behind the magnification erector system. This means the reticle stays the same size in your field of view regardless of the magnification setting. The consequence is that the MOA values on the reticle are **only accurate at one specific magnification setting**, usually the highest power (e.g., 10x on a 3-10x scope or 20x on a 5-20x scope). If you use a lower magnification, the MOA hash marks will represent *more* than their labeled MOA value. For example, if a hash mark is 1 MOA at 10x, it might represent 2 MOA at 5x.
It is absolutely vital to know whether your scope is FFP or SFP, especially if you plan to use the reticle for holds. If you have an SFP scope, you must either keep it on the designated magnification where the MOA values are true or perform quick mental calculations to adjust for your current magnification. For consistent and simple use of MOA reticles, FFP scopes are generally preferred.
Putting MOA into Practice: Real-World Scenarios
Let’s bring it all together and look at how MOA on a rifle scope is used in various practical shooting situations.
Zeroing Your Rifle with MOA
We touched on this earlier, but let’s elaborate. A proper zero is the foundation of accurate shooting.
- Set Up: Choose a standard zero distance, often 100 yards, and shoot from a stable rest.
- Fire a Group: Shoot a tight three or five-shot group. This helps average out shooter error.
- Measure Deviation: Measure the distance from the center of your group to your point of aim. Let’s say it’s 4 inches low and 2 inches right at 100 yards.
- Calculate MOA Adjustment:
- Elevation: You need to move UP 4 inches. At 100 yards, 4 inches = 4 MOA.
- Windage: You need to move LEFT 2 inches. At 100 yards, 2 inches = 2 MOA.
- Make Clicks: If your scope is 1/4 MOA per click:
- Elevation: Turn UP 16 clicks (4 MOA / 0.25 MOA per click = 16 clicks).
- Windage: Turn LEFT 8 clicks (2 MOA / 0.25 MOA per click = 8 clicks).
- Confirm: Fire another group to confirm your zero. Repeat if necessary until you’re consistently hitting your point of aim.
Compensating for Bullet Drop (Elevation)
Gravity pulls your bullet down the moment it leaves the barrel. The further the target, the more it drops. To hit targets at extended ranges, you need to compensate for this drop. This is where MOA really shines.
Let’s say you’re shooting at a target 500 yards away with your rifle that’s zeroed at 100 yards. You consult a ballistic calculator (a smartphone app or web tool is essential here) for your specific bullet, velocity, and environmental conditions. The calculator tells you that at 500 yards, your bullet will drop 25 inches relative to your 100-yard zero.
How do you translate 25 inches of drop into MOA?
At 500 yards, 1 MOA is approximately 5 inches (1 MOA * 5 = 5 inches).
So, 25 inches of drop is 5 MOA (25 inches / 5 inches/MOA = 5 MOA).
You would then dial 5 MOA UP on your elevation turret. If your scope has 1/4 MOA clicks, that’s 20 clicks (5 MOA / 0.25 MOA per click = 20 clicks). Now, when you aim dead-on at the target, your bullet will impact where you’re aiming.
Adjusting for Wind (Windage)
Wind is another major factor that pushes your bullet off course. Just like bullet drop, wind deflection can be calculated in MOA. Your ballistic calculator can also provide windage solutions in MOA.
Imagine you’re at 500 yards again, and there’s a 10 mph full-value crosswind (meaning it’s blowing directly across your line of sight). Your ballistic calculator indicates this wind will push your bullet 15 inches to the left.
To correct for this, you need to adjust your point of impact 15 inches to the right.
At 500 yards, 1 MOA is ~5 inches.
So, 15 inches of wind drift is 3 MOA (15 inches / 5 inches/MOA = 3 MOA).
You would then dial 3 MOA RIGHT on your windage turret. With 1/4 MOA clicks, that’s 12 clicks (3 MOA / 0.25 MOA per click = 12 clicks).
Alternatively, if you’re using an MOA reticle and don’t want to dial, you could “hold off” 3 MOA to the right on your reticle. You’d aim your main crosshair into the wind and use the 3 MOA hash mark to the right of the center line as your aiming point.
Spotting and Correcting with a Partner
MOA also provides a clear and universal language for communication between a shooter and a spotter. If a spotter sees a shot impact 2 MOA low and 1 MOA left of the target, they can simply call out, “Shooter, up 2, right 1.” The shooter, understanding MOA, knows exactly how many clicks to dial on their scope without any ambiguity. This streamlines the process and leads to faster, more accurate follow-up shots.
Conclusion: Embrace the Power of MOA
By now, you should have a solid understanding of what MOA means on a rifle scope and how profoundly it impacts your ability to shoot accurately. It’s not just a fancy term; it’s a practical, elegant system that simplifies complex ballistic calculations into easily manageable adjustments.
From precisely zeroing your rifle to compensating for bullet drop and wind at extended ranges, MOA gives you the tools to make informed decisions and achieve consistent hits. Whether you use your turrets to dial in your adjustments or rely on an MOA reticle for quick holds, embracing MOA will elevate your shooting skills significantly.
Remember, practice is key. The more you work with your MOA scope, the more intuitive these concepts will become. Get out to the range, experiment with your adjustments, consult your ballistic data, and watch your accuracy improve. Mastering MOA on a rifle scope is a journey towards greater precision, confidence, and enjoyment in your shooting endeavors. Happy shooting!
Frequently Asked Questions
What’s the main benefit of using MOA on a rifle scope?
The main benefit of MOA is its scalability and intuitive nature for shooters familiar with imperial measurements. It allows for precise, predictable adjustments that directly correlate to the impact point on the target, making it easier to compensate for bullet drop and wind at varying distances.
How do I know if my scope uses MOA or MIL?
You can usually tell by looking at the markings on your scope’s adjustment turrets or by checking the product specifications. MOA turrets will typically be labeled with fractions like “1/4 MOA” or “1/2 MOA,” while MIL turrets will be marked with “0.1 MIL” or “1/10 MRAD.”
If my shot is 6 inches low at 200 yards and my scope is 1/4 MOA, how many clicks do I need?
At 200 yards, 1 MOA equals approximately 2 inches. So, 6 inches low means you need to adjust 3 MOA (6 inches / 2 inches/MOA). With 1/4 MOA clicks, you’d need to turn your elevation turret UP 12 clicks (3 MOA / 0.25 MOA per click).
Is MOA only for long-range shooting?
While MOA is incredibly beneficial for long-range shooting due to the need for precise adjustments over distance, it’s equally useful for close-range shooting and zeroing. It provides a systematic and repeatable way to achieve accuracy, regardless of the distance.
Why do some shooters prefer MOA over MIL, or vice-versa?
Preference often comes down to familiarity. Shooters who grew up with imperial measurements (inches, yards) often find MOA more intuitive because of the “inch at 100 yards” rule. Those accustomed to the metric system or who value the simplicity of base-10 calculations might prefer MIL/MRAD.
Can MOA help me calculate target size or distance?
Yes, MOA can be used for “ranging” targets if you know their actual size. By measuring how many MOA a known-sized object spans in your reticle, you can estimate its distance using a simple formula. This is a common application of MOA reticles in the field.

