AO on a rifle scope means Adjustable Objective. An AO scope uses a front objective ring to manually focus the lens, eliminate parallax error, and keep the reticle and target in the same focal plane. This adjustment improves image sharpness and accuracy at varying distances, especially for long-range or precision shooting.
In this comprehensive guide, we’ll explain everything you need to know about AO scopes—from basic definitions to practical usage techniques that will transform your shooting experience.
What Does AO Mean on a Rifle Scope?
Looking at a rifle scope, you’ll often notice markings and abbreviations that might seem confusing at first glance. AO is one such marking that plays a crucial role in precision shooting. Let’s break down exactly what this feature means and how it works.
Definition of AO (Adjustable Objective)
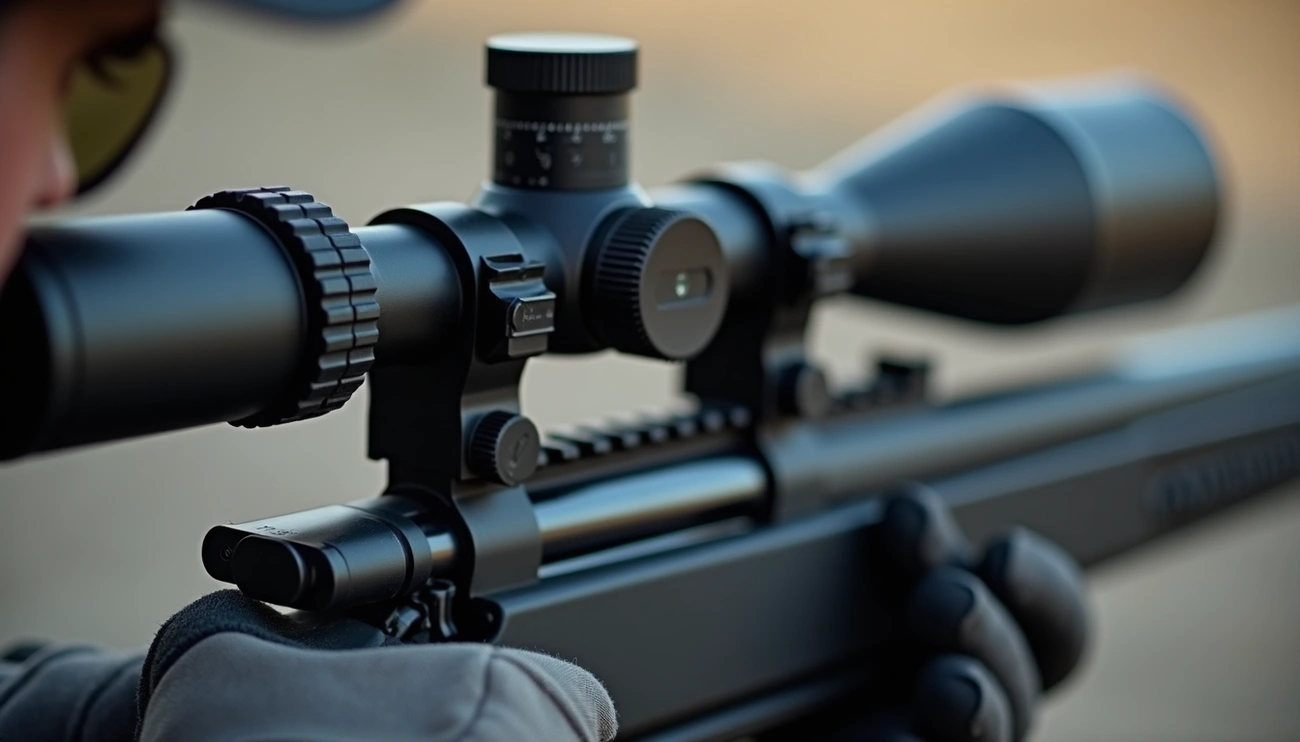
AO stands for Adjustable Objective, which refers to a rotating ring located around the objective bell (front end) of the scope. This adjustment mechanism allows shooters to bring targets at varying distances into the same focal plane as the reticle. The objective lens is the front glass element of your scope, and in AO models, this lens can be physically moved to optimize focus at different ranges.
Most AO scopes feature distance markings (typically 50, 100, 200 yards and beyond) directly on the adjustment ring, making it straightforward to set your scope for specific shooting distances.
What is AO on a scope used for?
The primary purpose of an AO scope is to eliminate parallax error – that annoying visual shift where your reticle seems to move relative to your target when you slightly change your eye position. This error becomes particularly noticeable when aiming at distances beyond 50 yards and can significantly affect your shot placement.
By aligning the reticle and target on the same focal plane, an AO scope ensures that:
- Your target appears crystal clear and perfectly focused.
- The reticle stays true to your point of aim regardless of head position.
- You can make precise shots even at challenging distances.
For competitive shooters and hunters, these benefits are invaluable since even minor misalignments can result in missed shots.
AO scope meaning vs fixed objective scopes
Unlike AO scopes, fixed objective scopes come with a preset parallax setting (commonly at 100 yards for centerfire rifles). Although this works adequately for general shooting at medium ranges, it creates limitations.
The fundamental advantage of AO scopes over fixed-parallax models is their flexibility. With an AO scope, you always retain the option to adjust for different shooting scenarios. As one experienced shooter noted, “If you go with a fixed parallax scope, you are stuck with that parallax. With the adjustable objective, you always have the option to make any adjustment that the scope allows.”
Moreover, AO scopes excel in precision shooting applications where accuracy at various distances is essential. Nevertheless, for shooting primarily at distances under 50 yards, the AO feature becomes less critical, as parallax error is minimal at shorter distances.
How AO Scopes Work: The Basics
To properly master your rifle scope, you need to understand what happens inside when you make adjustments. The mechanics behind that AO ring directly impact your shooting accuracy, making this knowledge crucial for consistent performance.
Understanding parallax and its impact
Parallax in rifle scopes is a visual effect that occurs when your reticle and target aren’t on the same focal plane. This misalignment causes the reticle to appear to shift relative to your target when you move your head position—even if your rifle remains perfectly still.
The consequences of unaddressed parallax error become increasingly severe at longer distances. While minimal at close ranges (under 50 yards), parallax can significantly throw off your aim at extended distances, making precise shot placement nearly impossible. For long-range shooters, ignoring parallax adjustment essentially guarantees inaccuracy.
How AO helps eliminate parallax
An adjustable objective works by physically moving lens elements within the objective lens group. By rotating the AO ring, you’re actually adjusting the distance between lenses in the objective assembly, which changes the focal plane of the target image.
The goal is straightforward: align the reticle and target image on exactly the same focal plane. Once properly adjusted, you can test for proper alignment by moving your head slightly while looking through the scope—the reticle should remain fixed on your target regardless of eye position. This elimination of parallax error ensures your point of aim truly matches your point of impact.
AO vs side focus: what’s the difference?
The primary distinction between these two adjustment methods lies in both location and mechanics. AO scopes feature a rotating ring near the objective lens (front end), whereas side focus scopes place the adjustment dial on the left side of the scope tube.
Regarding mechanics, AO directly adjusts the objective lens group. In contrast, side focus introduces an additional lens between the objective group and the first focal plane that moves back and forth.
Each system offers distinct advantages. AO scopes generally provide superior optical clarity because they contain fewer lens elements. Additionally, they typically excel at close-range focusing, making them popular among airgun shooters. Side focus systems offer greater convenience during field use, as they don’t require reaching forward to make adjustments, allowing shooters to maintain their position while making adjustments.
How to Use an AO Scope Effectively
Properly setting up your AO scope requires a methodical approach for maximum accuracy. Following these four critical steps will ensure you get the most from your adjustable objective scope.
Step 1: Adjust the eyepiece for reticle clarity
First, focus the eyepiece to make your reticle crystal clear. Point your scope toward a blank background, such as the sky or a plain wall. Unlock the eyepiece by turning the lock ring a few turns, then adjust the eyepiece by rotating it until the reticle appears sharp and crisp. This step must be completed before any objective adjustment, as it ensures your eye is properly focused on the reticle itself.
Step 2: Set the AO ring to match the target distance
Once your reticle is in focus, rotate the AO ring to match your target’s distance. For precision, use a rangefinder to determine exact distances. Simply turn the adjustment ring near the objective lens to align with the measured yardage—for instance, set to 100 yards for targets at that distance.
Step 3: Check for parallax by moving your eye
After the adjustment, verify whether parallax is present by performing the “eye-shift test.” Without moving your rifle, slightly shift your eye position behind the scope. If the reticle appears to move across your target, parallax is present and further adjustment is needed.
Step 4: Fine-tune for a sharp image and reticle alignment
Finally, make minor adjustments until both target and reticle appear perfectly sharp simultaneously. Always start adjustments from the infinity position when resetting. For consistent results, professional benchrest shooters routinely focus in the same direction—starting from infinity and moving to the correct focus point.
Common Mistakes and Tips for Better Accuracy
Even experienced shooters make critical errors when using AO scopes. Recognizing these common mistakes can drastically improve your shooting precision.
Mistake: Using the eyepiece to fix parallax
One common error is adjusting the eyepiece when encountering parallax. The eyepiece focus ring serves only to sharpen the reticle itself, not to bring your target into focus or eliminate parallax. Consequently, attempting to fix parallax by tweaking the eyepiece will compromise reticle clarity rather than solving the alignment problem.
Tip: Always start adjustments from infinity
Professional shooters typically begin their AO adjustments from the infinity position. This approach provides a consistent starting point, ensuring your adjustments follow a predictable pattern. Subsequently, when setting up at a new location, rotate to infinity first, and afterward adjust down to your estimated target distance.
Tip: Use a rangefinder for better distance estimation
Accurate distance measurement undoubtedly enhances the precision of parallax adjustment. Despite having yardage markings on your AO ring, these indicators often shift with temperature changes as lenses and metal components expand or contract. Hence, using a laser rangefinder provides exact distances, enabling much more precise parallax correction.
Mistake: Ignoring lighting conditions during setup
The quality of light between you and your target noticeably affects scope performance. Indeed, performance varies dramatically between bright midday sun and overcast conditions. Furthermore, many shooters incorrectly judge their scope’s quality based on worst-case lighting scenarios. Adjusting magnification downward in low-light conditions can help maintain image brightness.
Conclusion
Understanding what AO means on a rifle scope can transform how we approach precision shooting. Throughout this guide, we’ve explored how Adjustable Objective technology helps eliminate parallax error – that frustrating misalignment between reticle and target that compromises accuracy, especially at longer ranges.
After all, the primary advantage of AO scopes lies in their flexibility. Unlike fixed objective alternatives, AO scopes allow us to adapt to various shooting distances with remarkable precision. Therefore, mastering the proper adjustment technique becomes essential – starting with a clear reticle focus, setting the appropriate distance on your AO ring, checking for parallax with the eye-shift test, and fine-tuning for optimal clarity.
Most importantly, avoiding common mistakes will significantly improve your shooting performance. Remember not to confuse eyepiece adjustments with parallax correction, always begin adjustments from the infinity position, and use a rangefinder for accurate distance estimation. Additionally, paying attention to lighting conditions helps maximize your scope’s performance across different environments.
Whether you’re a competitive shooter or a dedicated hunter, this knowledge about AO scopes ultimately translates into tangible improvements in your shooting accuracy. The ability to eliminate parallax error means your point of aim truly matches your point of impact – arguably the most crucial factor for consistent success.
Next time you head to the range or field with your AO-equipped rifle, you’ll appreciate how this seemingly small feature makes such a substantial difference in your shooting experience. The few extra seconds spent properly adjusting your scope will reward you with tighter groups and greater confidence in your shots.