
Mastering how to use a rifle scope is fundamental for accurate shooting. This guide breaks down the process, covering everything from proper mounting and setting eye relief to the crucial steps of bore-sighting and zeroing your optic. Learn to confidently adjust for windage, elevation, and parallax, transforming your shooting precision and enhancing your experience in the field.
There’s something incredibly satisfying about hitting a target dead center, whether it’s for hunting, sport, or just honing your skills at the range. While the rifle itself plays a huge role, often the unsung hero of that precise shot is the scope sitting atop it. A rifle scope is a marvel of optical engineering, designed to bring your target closer and help you place your shot exactly where you intend. But having a scope isn’t enough; you need to know how to use a rifle scope effectively to unlock its full potential.
For many, the world of optics can seem a bit daunting at first. With terms like MOA, MIL, parallax, and eye relief, it’s easy to feel overwhelmed. However, demystifying your rifle scope is a straightforward process, and with a little guidance, you’ll be adjusting turrets and making precise shots like a seasoned pro. Think of this guide as your friendly companion on the journey to mastering your optic. We’ll walk you through everything from the absolute basics of mounting to advanced field adjustments, ensuring you understand how to use a rifle scope with confidence.
So, whether you’re a first-time rifle owner eager to learn the ropes or an experienced shooter looking for a refresher, you’ve come to the right place. We’re going to break down each step into easy-to-understand chunks, packed with practical tips. By the end, you won’t just know *what* to do, but *why* you’re doing it, transforming your shooting experience and making every trip to the range or field more successful. Let’s dive in and learn how to use a rifle scope like a true marksman!
Key Takeaways
- Proper Mounting and Eye Relief are Paramount: Correctly mounting your scope and setting eye relief are critical first steps for comfortable, safe, and consistent aiming.
- Bore Sighting Gets You on Paper: Before live firing, bore sighting helps align your scope with your rifle’s barrel, ensuring your initial shots are close enough to the target for fine-tuning.
- Zeroing is the Foundation of Accuracy: The process of zeroing ensures your point of aim matches your point of impact at a specific distance, making every shot precise and predictable.
- Understand Your Turrets and Adjustments: Learning how windage and elevation turrets work (MOA or MIL) and when to use them is essential for making precise corrections to your shot placement.
- Parallax Adjustment Improves Precision: For scopes with this feature, correctly adjusting for parallax eliminates reticle shift, which is crucial for consistent accuracy, especially at varying distances.
- Practice Makes Perfect: Consistent practice with your rifle and scope, understanding ballistics, and making precise adjustments will build confidence and significantly improve your shooting skills.
Quick Answers to Common Questions
What is eye relief?
Eye relief is the optimal distance your eye needs to be from the ocular lens of the scope to see a full, clear, and unobstructed image. Proper eye relief is crucial for comfort, safety (preventing scope bite), and consistent aiming.
What’s the difference between MOA and MIL?
MOA (Minute of Angle) and MIL (Milliradian) are both angular units of measurement used for scope adjustments and reticle subtensions. MOA is approximately 1 inch at 100 yards, while MIL is approximately 3.6 inches at 100 yards. They are simply different systems, and it’s important to use a scope where the reticle and turrets match (e.g., MOA/MOA or MIL/MIL).
What is parallax?
Parallax is the apparent shift of the reticle against the target when your eye moves slightly off-center from the scope’s optical axis. It occurs when the target and the reticle are not on the same focal plane, leading to aiming errors. Scopes with parallax adjustment allow you to correct this for different distances.
Why do I need to bore sight?
Bore sighting is a preliminary step that roughly aligns your scope’s reticle with your rifle’s bore. It ensures that your initial shots will be on target at a close range (e.g., 25-50 yards), saving you significant time and ammunition during the actual zeroing process.
How often should I re-zero my rifle?
You should re-zero your rifle if you change ammunition types, after any significant impact or rough handling of the rifle/scope, if you notice unexplained inaccuracies, or whenever there’s a significant change in environmental factors like temperature or altitude if shooting at long distances. A quick check before each hunting season or important range session is always a good idea.
📑 Table of Contents
Understanding Your Rifle Scope: The Basics
Before we can even begin to talk about how to use a rifle scope, it’s important to understand the different parts and what they do. Knowing the anatomy of your scope will make all the subsequent steps much clearer.
Magnification
This is probably the most obvious feature. Magnification, often expressed as “3-9x” or “10x,” tells you how much closer your target appears. A 3-9x scope means it can magnify your target from 3 times to 9 times its actual size. A 10x scope is fixed at 10 times magnification. Higher magnification isn’t always better; it narrows your field of view and can make holding steady harder. For most hunting and general shooting, a variable low-to-mid range power is very versatile.
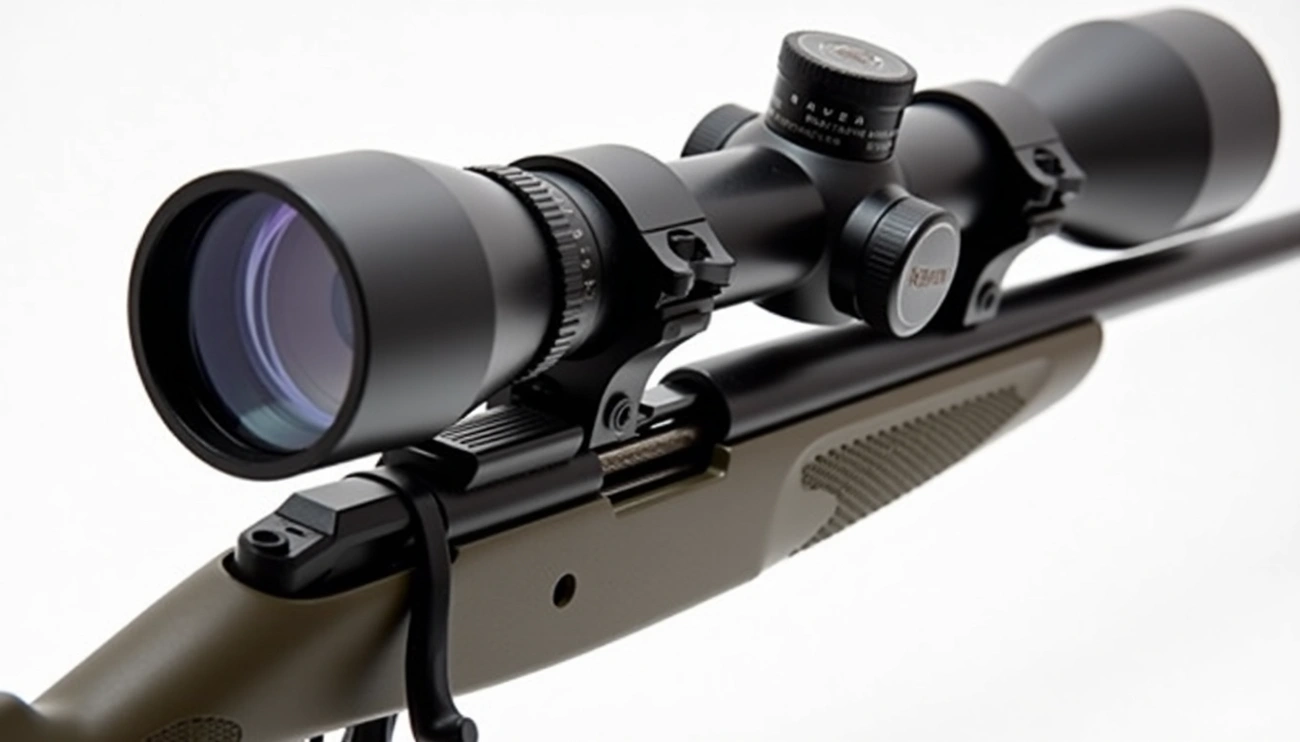
Objective Lens
The objective lens is the large lens at the front of your scope, closest to the muzzle of your rifle. Its job is to gather light and transmit it to your eye. A larger objective lens (e.g., 40mm vs. 50mm) generally gathers more light, resulting in a brighter, clearer image, especially in low-light conditions. However, larger lenses also mean a heavier, bulkier scope and require higher scope rings.
Ocular Lens and Eyepiece
This is the lens you look through, closest to your eye. The ocular lens works with the objective lens to present a magnified image of your target and the reticle. Around the ocular lens, you’ll find the diopter adjustment ring, which helps you focus the reticle itself to your individual eyesight.
Reticle (Crosshairs)
The reticle is the aiming pattern inside your scope. The classic “crosshairs” are just one type. Reticles can range from simple duplex crosshairs to complex BDC (Bullet Drop Compensator) or MIL-Dot/MRAD and MOA designs with multiple aiming points for different distances or wind conditions. Understanding your specific reticle is crucial for precise shooting, especially at longer ranges or in varying conditions.
Windage and Elevation Turrets
These are the adjustable knobs, usually found on top (elevation) and the side (windage) of your scope’s main tube. They allow you to move the point of impact of your bullet. Turning the elevation turret moves the reticle up or down, while the windage turret moves it left or right. Each “click” on a turret represents a specific adjustment value, often 1/4 MOA or 0.1 MIL, which we’ll discuss more when we get to zeroing.
Parallax Adjustment
Some scopes, especially higher magnification or long-range models, feature a parallax adjustment knob. This is often found on the side of the scope (side focus) or as a ring on the objective lens. Parallax is the apparent shift of the reticle relative to the target when you move your eye. Adjusting for parallax ensures the target and the reticle are on the same focal plane, eliminating this shift and improving accuracy, particularly at different distances.
Mounting and Eye Relief: The Foundation of Accuracy
Learning how to use a rifle scope effectively starts long before you ever pull the trigger. Proper mounting and setting eye relief are non-negotiable for safety, comfort, and consistent accuracy. A poorly mounted scope can shift, lose zero, or even injure you.

Visual guide about How to Use a Rifle Scope
Image source: foreseenoptics.com
Choosing the Right Rings and Base
First, you’ll need the correct scope rings and a mounting base. The base attaches to your rifle, and the rings attach the scope to the base. Rings come in different heights (low, medium, high) and diameters (1-inch, 30mm, 34mm, etc.) to match your scope’s tube diameter and ensure the objective lens clears the barrel. Always choose quality rings and bases; they are the link between your rifle and your scope.
Proper Scope Mounting
Mounting your scope should be done carefully and ideally with a torque wrench to ensure screws are tightened to the manufacturer’s specifications without overtightening. Here’s a simplified process:
- Attach the Base: Secure the mounting base to your rifle’s receiver. Ensure it’s straight and tight.
- Place Bottom Rings: Attach the bottom halves of your scope rings to the base, but don’t tighten them fully yet.
- Position the Scope: Place the scope into the bottom rings. Don’t add the top rings yet.
- Set Eye Relief: This is a crucial step for how to use a rifle scope safely and effectively. Shoulder your rifle in your natural shooting position. Slowly slide the scope forwards or backwards in the rings until you see a full, clear, unobstructed view through the scope without any black “half-moon” shadows (known as vignetting) around the edges. This ideal distance is your eye relief. It typically ranges from 3 to 4 inches. Once found, mark its position.
- Level the Reticle: With the scope still loose in the rings but at the correct eye relief, ensure the reticle is perfectly level with the horizon. You can use a scope leveling kit or a plumb bob at a distance. A canted reticle will cause your bullet to drift horizontally as you adjust vertically, and vice versa.
- Tighten Everything: Once eye relief and reticle level are set, carefully install the top halves of the rings. Tighten all screws in a crisscross pattern, gradually increasing torque to the manufacturer’s recommended specifications. Be careful not to overtighten, as this can damage the scope tube.
Focusing the Reticle
Before you even look at a target, you need to focus the reticle for your individual eyesight. This is done using the diopter adjustment ring on the ocular lens. Point the scope at a plain, bright background (like the sky, but not directly at the sun). While looking *through* the scope, quickly glance at the reticle. If it’s blurry, adjust the diopter ring until the reticle is razor-sharp. Do this quickly, as your eye will try to compensate for blurriness if you stare too long. Once focused, you shouldn’t need to adjust it again unless someone else uses your scope.
Bore Sighting Your Rifle: Getting on Paper
Bore sighting is a preliminary step that gets your scope “on paper” at a close range. It roughly aligns your scope’s reticle with your rifle’s bore (the inside of the barrel). This prevents you from wasting a lot of ammunition trying to find your first shots on the target. It’s not a substitute for zeroing, but it makes the zeroing process much faster and less frustrating.
What is Bore Sighting?
In simple terms, bore sighting ensures that when you look through your scope, your crosshairs are generally pointing at the same spot your barrel is. Imagine looking straight through the barrel at a target. Bore sighting helps the scope see that same target. It’s how to use a rifle scope efficiently from the start.
Methods of Bore Sighting
Visual Bore Sighting (Bolt-Action Rifles)
This is the simplest method if your rifle allows it:
- Secure your rifle in a sturdy rest (sandbags, vice).
- Remove the bolt from your rifle.
- Look directly through the bore of the barrel at a target placed 25-50 yards away. Adjust the rifle so the center of the target is perfectly centered in the bore.
- Without moving the rifle, look through your scope. Use the scope’s windage and elevation turrets to move the reticle until it’s also centered on the target.
- Replace the bolt. You should now be “on paper.”
Bore Sighting with a Laser Boresighter
A laser boresighter is a tool that projects a laser beam out of your barrel, indicating where the barrel is pointed. This works for all rifle types.
- Insert the laser boresighter into your rifle’s muzzle or chamber, following its instructions.
- Place a target at 25 yards.
- Rest your rifle securely.
- Turn on the laser. The red dot will appear on the target.
- Adjust your scope’s windage and elevation turrets until the center of your reticle aligns with the laser dot.
- Remove the boresighter before firing.
After bore sighting, your initial shots at 25 or 50 yards should be on the target, making the final zeroing process much easier.
Zeroing Your Rifle Scope: Achieving Precision
Zeroing is the most critical step in learning how to use a rifle scope accurately. It’s the process of adjusting your scope’s turrets so that your point of aim (where your reticle is) matches your point of impact (where the bullet actually hits) at a specific distance. This is typically done at 100 yards for most rifle calibers, but can vary based on your shooting discipline.
What is Zeroing?
Think of zeroing as calibrating your scope to your specific rifle and ammunition at a particular range. If your rifle is “zeroed at 100 yards,” it means that when you aim dead-on at a target 100 yards away, your bullet will hit exactly where you’re aiming (assuming no wind or other external factors). Understanding how to use a rifle scope means mastering this step.
Setting Up for Zeroing
- Choose Your Zero Distance: For most centerfire rifles, 100 yards is standard. For rimfire or air rifles, 25 or 50 yards might be more appropriate.
- Use a Stable Rest: A solid shooting bench, sandbags, or a bipod is essential. Eliminate as much human error as possible to accurately see where your shots are landing.
- Quality Ammunition: Use the same ammunition you intend to use for hunting or serious target shooting. Different loads can have different points of impact.
- Target with Grid: A target with a 1-inch grid pattern is very helpful for measuring your adjustments.
Making Adjustments: MOA vs. MIL
Your scope turrets will adjust in either MOA (Minute of Angle) or MIL (Milliradian). It’s crucial to know which your scope uses, as they are different units of angular measurement.
- MOA: One MOA is approximately 1.047 inches at 100 yards. Most scopes adjust in 1/4 MOA clicks, meaning each click moves the point of impact by about 1/4 inch at 100 yards. So, if your shot is 4 inches low and 2 inches left at 100 yards, you’d need to adjust your elevation turret “up” 16 clicks (4 inches / 0.25 inches/click = 16 clicks) and your windage turret “right” 8 clicks (2 inches / 0.25 inches/click = 8 clicks).
- MIL (MRAD): One MIL is 3.6 inches at 100 yards (or 10 cm at 100 meters). Most MIL scopes adjust in 0.1 MIL clicks, meaning each click moves the point of impact by 0.36 inches at 100 yards. If your shot is 3.6 inches low and 1.8 inches left at 100 yards, you’d adjust elevation “up” 10 clicks (3.6 / 0.36 = 10) and windage “right” 5 clicks (1.8 / 0.36 = 5).
Always remember: Adjust the scope in the direction you want the bullet to go! If your bullet hits low, adjust “UP.” If it hits left, adjust “RIGHT.”
The Zeroing Process
- First Shots: Fire 3 shots at the center of your target, aiming as precisely as possible. This is called a “group.”
- Analyze the Group: After firing, identify the center of your group. Measure how far and in what direction your group is from your aiming point.
- Adjust the Scope: Based on your measurements and your scope’s click values (MOA or MIL), make the necessary adjustments to your windage and elevation turrets.
- Re-shoot and Confirm: Fire another 3-shot group. Hopefully, your new group is closer to the bullseye. Repeat steps 2 and 3 until your groups are consistently hitting your aiming point.
- Record Your Zero: Once zeroed, note the turret settings (e.g., “0” or a specific number of clicks from mechanical zero) and the environmental conditions (temperature, altitude). Some scopes allow you to reset your turrets to “0” after zeroing, which is very convenient for future adjustments.
Advanced Scope Usage and Best Practices
Once you’ve mastered the basics of how to use a rifle scope and have a solid zero, you can explore more advanced techniques to maximize your precision in varying conditions and at longer ranges.
Understanding Ballistics: Holdovers and Holdoffs
Bullets don’t fly in a straight line; gravity pulls them down, and wind pushes them sideways. Understanding how your bullet behaves at different distances is called ballistics. This knowledge is key for how to use a rifle scope beyond your zeroed range.
- Bullet Drop: Beyond your zero distance, your bullet will drop. Instead of adjusting turrets for every shot, you can use “holdovers.” Many reticles have multiple aiming points or hash marks below the main crosshair, allowing you to aim higher to compensate for bullet drop without touching your turrets.
- Windage Holdoffs: Similarly, wind will push your bullet. You can use “holdoffs” by aiming slightly into the wind using the horizontal hash marks on your reticle. This requires practice and good wind reading skills.
To effectively use holdovers and holdoffs, you’ll need to know your bullet’s ballistic trajectory, often found in ballistic charts or computed with a ballistic calculator app. Practice at various distances to confirm these holds.
Parallax Adjustment in the Field
If your scope has parallax adjustment, it’s not just a set-it-and-forget-it feature. You should adjust it for the specific distance to your target. To do this, aim at your target, then move your head slightly up and down, side to side, behind the scope. If the reticle appears to shift relative to the target, adjust the parallax knob until the reticle remains perfectly still. This ensures maximum clarity and eliminates potential point-of-impact errors caused by inconsistent head placement.
Using Reticle Subtensions (MOA/MIL Reticles)
Many modern scopes feature reticles with precise MOA or MIL markings. These aren’t just for holdovers; they can be used for range estimation if you know the size of your target, or for quickly measuring a correction after spotting a miss. For instance, if you see your bullet strike 2 MILs high, you can dial down 2 MILs on your elevation turret without even needing to measure it on paper.
Windage and Elevation Adjustments in Practice
While holdovers/offs are great for quick shots, for truly precise long-range shooting, dialing your turrets is often preferred. This requires knowing your target distance, estimating wind, and applying ballistic data to calculate the exact MOA or MIL adjustments needed. After shooting, “dial back” to your zero settings to avoid confusion on your next shot.
Maintaining Your Scope
Learning how to use a rifle scope also means knowing how to care for it. Keep your lenses clean with a specialized lens cloth and cleaning solution – never use your shirt or harsh chemicals. Protect your scope with lens caps when not in use. Periodically check that your scope rings and base screws are still tight. A well-maintained scope will serve you reliably for years.
Remember, proficiency with a rifle scope doesn’t happen overnight. It takes practice, patience, and a willingness to learn. Spend time at the range, experiment with different techniques, and get to know your equipment intimately. Each time you pick up your rifle and scope, you’ll feel a little more confident, and your shots will become more precise. Enjoy the journey!
Conclusion
Mastering how to use a rifle scope is a journey that transforms your shooting capabilities, opening up new levels of precision and confidence. We’ve covered the essentials, from understanding the various components of your optic to the crucial steps of proper mounting, bore sighting, and precise zeroing. You now have a solid foundation for making accurate adjustments, whether you’re compensating for bullet drop or correcting for wind.
Remember, your rifle scope is a powerful tool, but its effectiveness is only as good as your understanding and application of its features. Take the time to practice each step, paying close attention to the details of eye relief, reticle focus, and turret adjustments. Experiment with different distances, learn your rifle’s ballistic nuances, and never underestimate the value of consistent range time.
By applying the knowledge shared in this guide, you’re well on your way to becoming a more proficient and precise shooter. So, get out there, safely practice these techniques, and enjoy the satisfaction that comes with truly knowing how to use a rifle scope to its fullest potential. Happy shooting!
Frequently Asked Questions
Can I use any scope on any rifle?
While physically possible to mount many scopes on various rifles, it’s crucial to match the scope’s features and durability to the rifle’s caliber and intended use. For example, a high-recoil magnum rifle requires a scope specifically designed to withstand that stress, and a long-range scope won’t be ideal for a close-quarters carbine.
What magnification do I need?
The ideal magnification depends heavily on your shooting application. For hunting in dense woods, a lower magnification (1-4x or 2-7x) offers a wider field of view. For target shooting or hunting at longer distances, higher magnification (10x or 4-16x, 6-24x) allows for more precise aiming. Consider a variable power scope for versatility.
How do I clean my scope lenses?
Always use a specialized lens cleaning kit, which typically includes a soft brush to remove loose debris, a lens cleaning solution, and a microfiber cloth designed for optics. Breathe lightly on the lens, apply a tiny drop of solution, and gently wipe in a circular motion from the center outwards. Never use harsh cleaners or abrasive materials.
Is it okay to store my rifle with the scope attached?
Yes, it’s perfectly fine and often recommended to store your rifle with the scope attached. This keeps the scope zeroed and ready to use. Just ensure the rifle is stored safely, securely, and in a way that protects the scope from accidental bumps or falls.
What’s the best way to practice scope usage without live ammo?
Dry firing is an excellent way to practice. Set up a safe target, practice mounting the rifle, achieving proper eye relief, focusing the reticle, and smooth trigger control. You can also use laser training cartridges that activate with a dry fire, providing immediate feedback on your point of aim. These methods build muscle memory without the need for live ammunition.
My shots are grouping, but not where I’m aiming. What’s wrong?
If your shots are forming consistent groups but are off-center from your aiming point, it means your rifle is likely shooting accurately but is not properly zeroed. You simply need to adjust your scope’s windage and elevation turrets to move your point of impact to match your point of aim. Follow the zeroing steps to correct this.


