Transform your firearm with a custom paint job! This comprehensive guide walks you through every step of how to paint a rifle, from initial preparation and choosing the right materials to applying a flawless finish and proper curing. You’ll learn essential techniques for cleaning, masking, spraying, and creating unique camouflage patterns, ensuring a durable and professional result that protects and personalizes your rifle.
Have you ever looked at your rifle and thought, “It could really use a fresh look?” Or maybe you’re heading out into the field and wish your trusty firearm blended in a little better with its surroundings. Well, you’re in luck! Painting a rifle is a fantastic DIY project that offers both personalization and practical benefits. It might seem a bit daunting at first, but with the right guidance, materials, and a good dose of patience, anyone can achieve a professional-looking finish right at home.
This isn’t just about aesthetics; painting your rifle can also add an extra layer of protection against the elements, helping to prevent rust and wear. Plus, there’s an immense satisfaction that comes from transforming something with your own two hands. We’re going to walk you through every single step, from selecting the right paints and preparing your workspace to applying those perfect coats and ensuring a long-lasting finish. So, grab a coffee, get comfortable, and let’s dive into everything you need to know about how to paint a rifle.
Key Takeaways
- Preparation is Paramount: Thorough cleaning, degreasing, and meticulous masking of all critical areas are the most important steps to ensure paint adhesion and prevent functional issues.
- Choose the Right Paint: Select durable, specialized paints designed for firearms, such as Alumahyde II, Cerakote (if comfortable with a kit), or high-quality camouflage aerosols like Rust-Oleum or Krylon, ensuring longevity and resistance to wear.
- Work in a Well-Ventilated Space: Always prioritize safety by working in an area with excellent airflow and wearing proper personal protective equipment, including a respirator, gloves, and eye protection.
- Apply Multiple Thin Coats: Achieve a professional and even finish by applying several light, even coats of paint rather than one thick layer, allowing adequate drying time between each application.
- Patience During Curing: The paint’s durability largely depends on proper curing. Follow manufacturer instructions diligently, as dry-to-touch is not the same as fully cured.
- Personalize and Protect: Painting your rifle not only allows for unique customization and camouflage but also adds a protective layer against rust, scratches, and environmental elements.
- Practice Makes Perfect: Don’t be afraid to experiment with patterns or techniques on scrap material first. The process of how to paint a rifle is a skill that improves with practice and attention to detail.
Quick Answers to Common Questions
Can I paint a rifle without disassembling it?
While technically possible, it’s strongly advised against. Disassembly ensures you can properly clean and mask all critical internal and moving parts, preventing paint from interfering with functionality and achieving a much more durable finish.
How long does the paint on a rifle last?
The lifespan of a rifle paint job depends heavily on the type of paint used, the quality of preparation, and how often the rifle is handled or exposed to harsh conditions. High-quality paints like Cerakote or Alumahyde II, with proper application and curing, can last for many years, offering excellent durability.
Do I need to prime my rifle before painting?
For most specialized firearm paints like Alumahyde II or quality aerosol camouflage paints, priming isn’t strictly necessary as they’re formulated for direct adhesion after proper surface preparation. However, a thin coat of self-etching primer can enhance adhesion on very slick surfaces.
What’s the most common mistake when painting a rifle?
The most common mistake by far is inadequate surface preparation, especially not thoroughly cleaning and degreasing the rifle. Any oils, grease, or dirt left on the surface will cause the paint to peel or chip prematurely.
Is it legal to paint my rifle?
Yes, it is generally legal to paint your rifle. However, ensure that you do not obscure the serial number, as this is illegal and can lead to severe penalties. Always keep the serial number clearly visible and unpainted.
📑 Table of Contents
Why Paint Your Rifle? More Than Just Aesthetics
Before we even think about picking up a spray can, let’s explore why you might want to paint your rifle in the first place. It’s often more than just making it look cool – though that’s definitely a perk!
Personalization and Expression
Your rifle is an extension of you, and customizing it with paint is a fantastic way to make it uniquely yours. Whether you prefer a subtle earth tone or a bold, multi-color pattern, a custom paint job allows you to express your style. It’s an opportunity to truly make your firearm stand out or perfectly complement your other gear.
Camouflage and Concealment
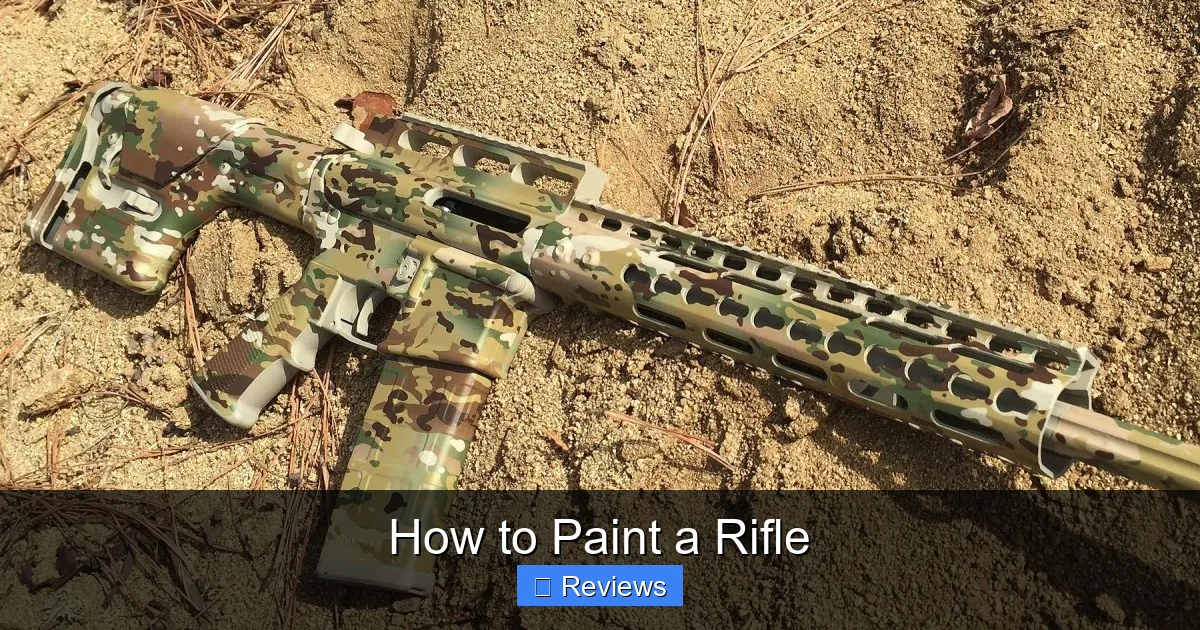
For hunters, competitive shooters, or anyone spending time outdoors, camouflage is a primary reason to paint a rifle. A well-executed camo pattern can significantly improve your ability to blend into your environment, making you less visible to game or competitors. From classic woodland patterns to modern digital designs, you can tailor your rifle’s look to the specific terrain you frequent. Knowing how to paint a rifle for effective camouflage is a skill in itself!
Protection and Preservation
Beyond looks, a good paint job acts as a protective barrier. It can shield the metal components of your rifle from rust, corrosion, and minor abrasions. This added layer of defense can extend the life of your firearm, especially if it’s frequently exposed to harsh weather conditions or rough handling. Think of it as an extra insurance policy for your investment.
Gathering Your Arsenal: Essential Tools and Materials
Success in painting a rifle hinges heavily on having the right tools and materials at hand. Don’t skimp on this step; good preparation prevents bad outcomes.
Cleaning Supplies
This is where it all begins. You’ll need industrial-strength degreasers like brake cleaner, acetone, or isopropyl alcohol to remove all oil, grease, and dirt from your rifle. Lint-free rags or microfiber cloths are essential, as are small brushes (like old toothbrushes) for getting into nooks and crannies.
Taping and Masking
Masking off areas you don’t want painted is critical. High-quality painter’s tape (blue or green tape works great) in various widths is a must. You might also want painter’s plastic or old newspapers to protect larger areas or your workspace. Don’t forget earplugs or foam pieces to mask the bore and any small holes.
Abrasives
To help the paint adhere properly, you’ll need to lightly scuff the surface. Fine-grit sandpaper (around 320-400 grit) or Scotch-Brite pads are perfect for this. The goal isn’t to remove the existing finish but to create a slight texture for the new paint to grip.
Paint Selection
Choosing the right paint is perhaps the most crucial decision. You need something durable, chemical-resistant, and designed for firearms.
- Aerosol Cans: For DIYers, specialized aerosol paints are very popular. Brands like Rust-Oleum Camouflage or Krylon Camouflage offer excellent durability in various matte colors. They are relatively easy to use and forgiving. Alumahyde II by Brownells is another fantastic option, offering even greater chemical and abrasion resistance, though it requires a longer cure time.
- Cerakote: If you’re looking for the ultimate in durability and chemical resistance, Cerakote is the gold standard. However, applying Cerakote properly usually requires specialized equipment (spray gun, oven for curing) and a specific application process. There are some DIY-friendly Cerakote kits available that air-cure, but they still demand meticulous preparation. For most people learning how to paint a rifle, aerosols are a great starting point.
Avoid standard hardware store spray paints that aren’t formulated for metal or high-wear surfaces, as they will chip and wear quickly.
Safety Gear
Never compromise on safety!
- Respirator: A high-quality respirator with organic vapor cartridges is absolutely essential to protect your lungs from paint fumes.
- Gloves: Nitrile gloves will protect your hands from chemicals and paint.
- Eye Protection: Safety glasses or goggles are a must to shield your eyes from overspray or chemical splashes.
Workspace Setup
You’ll need a well-ventilated area, preferably outdoors or in a garage with an open door and a fan. Lay down drop cloths, old cardboard, or plastic sheeting to protect surfaces. A sturdy stand or hooks to hang your rifle components will make painting much easier, allowing you to get even coverage from all angles.
Preparation is Key: The Foundation for a Lasting Finish
This is where most of the work actually happens. The quality of your paint job is 90% preparation. Skip any of these steps, and you risk a poor, peeling, or non-durable finish.
Disassembly
Carefully disassemble your rifle. Remove the stock, forend, optics, slings, and any accessories. Take out the bolt carrier group, trigger group, and any other internal parts that shouldn’t be painted. For semi-automatic rifles, you might want to remove springs, pins, and anything that moves freely or has critical tolerances. A good rule of thumb: if it moves, touches another moving part, or has a spring, it probably shouldn’t be painted. Consider taking pictures as you disassemble to help with reassembly!
Thorough Cleaning and Degreasing
This cannot be stressed enough. Any oil, grease, or dirt left on the surface will prevent the paint from adhering properly, leading to peeling.
- Spray all surfaces with a degreaser (brake cleaner, acetone, or isopropyl alcohol).
- Use a brush and rags to scrub every inch, especially in recessed areas and around pins.
- Repeat this process several times until your rags come away perfectly clean.
- Once clean, avoid touching the rifle parts with your bare hands, as skin oils can contaminate the surface. Wear gloves from this point on.
Sanding and Scuffing
Once perfectly clean, lightly scuff all surfaces that will be painted with fine-grit sandpaper (320-400 grit) or a Scotch-Brite pad. The goal is not to remove the existing finish, but to create micro-scratches that give the new paint something to bite into. This improves adhesion dramatically. After scuffing, wipe everything down again with isopropyl alcohol to remove any dust or residue, then let it dry completely.
Masking Off Critical Areas
This is the most time-consuming but essential step. Use high-quality painter’s tape to meticulously cover:
- The bore of the barrel (use a wadded earplug or foam).
- Any optics mounts or mounting surfaces.
- Serial numbers.
- The trigger group and inside the magazine well.
- Safety selectors, bolt releases, and other controls that need to move freely.
- Springs and pins.
- Interior surfaces of the receiver where the bolt travels.
- Any areas with tight tolerances or where parts mate and need smooth movement.
- Don’t forget the threads on the barrel if you plan to attach a muzzle device or suppressor later.
Press the tape down firmly to prevent paint from seeping underneath. Take your time here! A little extra effort now saves a lot of headache later.
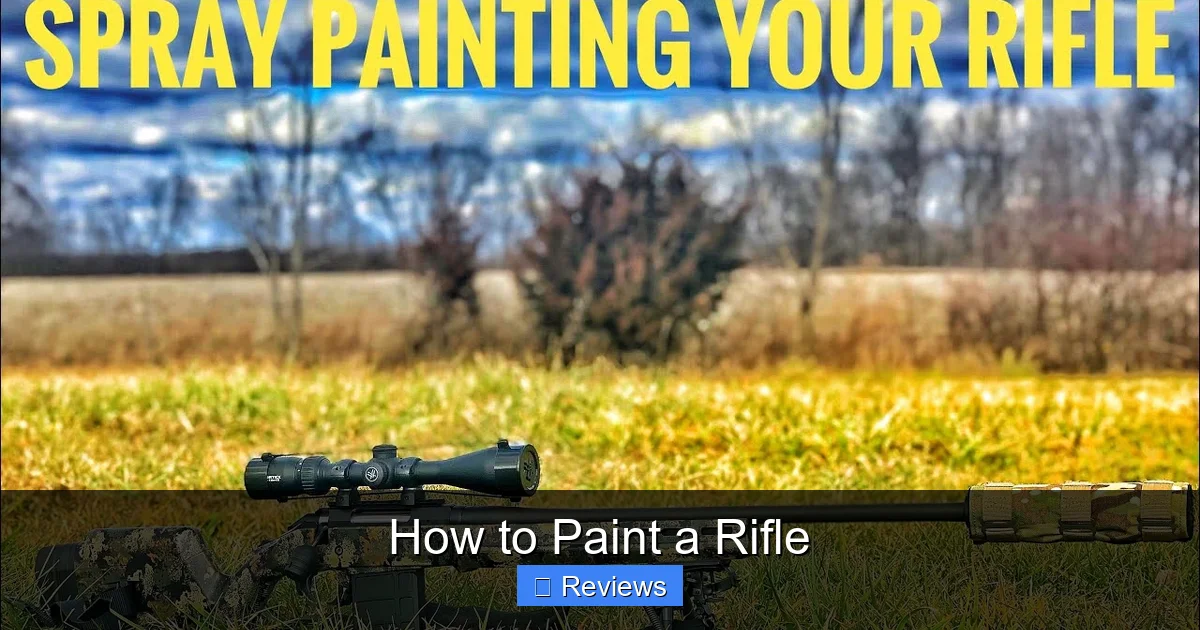
The Art of Application: Spraying Your Rifle
With your rifle fully prepped and masked, it’s finally time for the fun part: applying the paint.
Priming (Optional)
For most specialized firearm paints like Alumahyde II or quality camo aerosols, a primer isn’t typically necessary, as they are designed to adhere directly to metal and other surfaces after proper prep. However, if you’re painting over a very slick surface or want maximum adhesion insurance, a very thin coat of self-etching primer designed for metals can be used. Always ensure the primer is compatible with your chosen topcoat paint.
Paint Application Techniques
This is where patience and technique pay off.
- Shake Cans Thoroughly: Shake your paint cans for at least 1-2 minutes after you hear the mixing ball, and periodically during application.
- Test Spray: Always do a test spray on a piece of cardboard or scrap material first to check the spray pattern and ensure the can is working properly.
- Light, Even Coats: This is key. Apply multiple thin, even coats rather than one thick coat. A thick coat is more prone to runs, drips, and uneven drying.
- Consistent Distance and Movement: Hold the can about 8-12 inches away from the surface and move it in smooth, overlapping strokes. Don’t stop spraying while the can is directly over the rifle, start and end your spray pattern off the component.
- Rotate Parts: If hanging, rotate the components as you spray to ensure you hit all angles and avoid missing spots.
- Drying Between Coats: Crucially, allow adequate flash-off or drying time between coats. This is usually 5-15 minutes, but always check the paint manufacturer’s instructions. The paint should be dry enough that it’s no longer tacky, but not fully cured.
Creating Camouflage Patterns
This is where you can get really creative!
- Layering Colors: Start with your lightest base color (e.g., tan or light green), apply a few coats, and let it dry.
- Stenciling: Use natural elements like leaves, pine needles, or small branches as stencils. Hold them lightly against the surface and spray a contrasting color over them. You can also buy specialized camouflage stencils.
- Mesh or Netting: Drape some laundry mesh bag or camouflage netting over the rifle and lightly spray through it to create a cool, mottled pattern.
- Sponge Dabbing: Dab a piece of sponge into a contrasting paint color (sprayed onto a piece of cardboard first) and lightly dab it onto the rifle for a textured, broken-up pattern.
- Building Layers: Continue layering colors and patterns until you achieve your desired look. Remember, less is often more. You want to break up the rifle’s silhouette, not create a solid block of color.
Top Coat / Clear Coat (Optional, but Recommended)
Once you’re happy with your color layers, you might consider a matte clear coat. This adds an extra layer of protection against scratches and chemicals and can help unify the finish. Ensure it’s a matte or flat clear coat to avoid unwanted glare. Apply it with the same light, even coat technique as the color layers.
Curing and Reassembly: The Final Touches
You’re almost there! Don’t rush this final stage; proper curing is essential for the durability of your new paint job.
Proper Curing Times
This is often the most overlooked part when learning how to paint a rifle. “Dry to touch” is NOT “fully cured.”
- Aerosol Paints: Most aerosol camouflage paints can take 24-72 hours to be fully dry to handle and weeks to fully harden and become chip-resistant. Read the manufacturer’s instructions carefully.
- Alumahyde II: This often requires a very long cure time, sometimes weeks at room temperature, or can be accelerated by baking at low temperatures (check instructions carefully!).
During the curing period, handle the rifle as little as possible and avoid any harsh chemicals or abrasions. The longer you let it cure, the tougher the finish will be.
Gentle Unmasking
Once the paint is mostly dry but not fully cured and rock-hard (usually within a few hours of the final coat), carefully remove all the painter’s tape and masking. If you wait too long, the paint can fully cure over the tape, making it difficult to remove without peeling the paint along with it. Pull the tape slowly at a sharp angle to minimize the risk of lifting paint.
Reassembly Tips
Take your time reassembling your rifle. Refer to any photos you took during disassembly. Be gentle, as the paint will still be relatively soft. Avoid overtightening screws or forcing parts together. Check the functionality of all moving parts, safeties, and triggers before heading to the range. Make sure the bolt cycles smoothly and the magazine seats properly.
Post-Paint Care
For the first few weeks, be gentle with your freshly painted rifle. When cleaning, avoid harsh solvents directly on the painted surfaces. Use a soft cloth and mild cleaners. Over time, the paint will fully harden and become very durable.
Troubleshooting Common Painting Issues
Even with the best intentions, things can sometimes go sideways. Here are a few common issues and how to tackle them.
Runs and Drips
These usually happen when too much paint is applied in one spot or the coats are too thick.
Fix: If the paint is still wet, you can sometimes carefully wick away a drip with a corner of a paper towel. If it’s semi-dry, let it fully cure, then lightly sand the run smooth with fine-grit sandpaper (e.g., 600-800 grit) and respray the area with very light coats. Prevention is key: always apply thin, even coats.
Visual guide about How to Paint a Rifle
Image source: i.ytimg.com
Peeling or Flaking
This is almost always a sign of inadequate surface preparation, usually insufficient cleaning or degreasing. The paint didn’t have anything to properly adhere to.
Fix: The bad news is you’ll likely need to strip the paint from the affected area (or the entire piece) back down to the original finish, re-clean, scuff, and repaint. Ensure your degreasing step is exceptionally thorough.
Uneven Coverage or “Tiger Stripes”
This happens when you don’t use consistent spray patterns or don’t overlap your passes sufficiently.
Fix: Apply another few very light, even coats, focusing on smooth, overlapping passes. If the unevenness is severe, you might need to lightly sand the existing paint to even it out before respraying.
Orange Peel Texture
This dimpled, rough texture often occurs when the paint is too thick, sprayed from too far away, or applied in overly cold or humid conditions, causing it to dry too quickly on the surface before it can level out.
Fix: Allow the paint to fully cure. Then, you can try very gently wet-sanding the surface with extremely fine-grit sandpaper (2000+ grit) and polishing to smooth it out. For a textured finish, this might be acceptable, but for a smooth finish, prevention is best: ensure proper temperature/humidity, hold the can at the recommended distance, and apply thin coats.
Conclusion
Painting a rifle is a rewarding project that allows for deep personalization and adds practical protection to your firearm. While it requires patience and attention to detail, especially during the crucial preparation and masking stages, the process itself is straightforward. By following these steps – thorough cleaning, precise masking, strategic paint application, and proper curing – you can achieve a durable, professional-looking finish that will serve you well for years to come.
So, don’t be afraid to take the plunge. Gather your materials, set up your workspace, and transform your rifle into a unique piece that truly reflects your style and needs. The satisfaction of seeing your vision come to life on your own rifle is an experience every firearm enthusiast should try. Happy painting!
🎥 Related Video: Rubber band spray paint camo on gun. #spraypaint #cammo #guns
📺 Always Reloading
Frequently Asked Questions
What kind of paint is best for painting a rifle?
For DIY projects, durable aerosol paints specifically designed for firearms or high-wear applications are best. Brands like Rust-Oleum Camouflage, Krylon Camouflage, or Brownells Alumahyde II are popular choices due to their resistance to chemicals, abrasion, and harsh weather. For maximum durability, Cerakote is an excellent option, though it often requires more specialized equipment.
How important is masking when painting a rifle?
Masking is absolutely critical and arguably the most important step after cleaning. Meticulous masking protects critical internal components, moving parts, serial numbers, optics mounting surfaces, and the bore from paint, preventing malfunctions and ensuring the rifle operates safely and correctly.
Can I paint over an existing finish on my rifle?
Yes, you can often paint over an existing finish, provided it is sound (not flaking or peeling) and properly prepared. Thorough cleaning, degreasing, and light scuffing of the old finish are essential to ensure good adhesion for the new paint. If the old finish is compromised, it’s best to strip it first.
How do I achieve a good camouflage pattern on my rifle?
Achieving a good camouflage pattern involves layering multiple colors and breaking up the rifle’s silhouette. Start with a base color, then use natural elements like leaves, branches, or mesh as stencils, lightly spraying contrasting colors over them. Practice on scrap material first to refine your technique and pattern.
What should I do if my paint job starts to peel or chip?
If your paint job starts to peel or chip, it usually indicates poor surface preparation or insufficient curing. For minor chips, you might be able to touch them up. For extensive peeling, the best long-term solution is often to strip the compromised paint, thoroughly re-prepare the surface, and repaint it following all the steps diligently.
How long should I let my rifle paint cure before using it?
Curing times vary significantly based on the paint type. While paint might feel dry to the touch in hours, it often takes days, or even weeks for some specialized paints like Alumahyde II, to fully harden and achieve maximum durability. Always refer to the paint manufacturer’s specific instructions for recommended full cure times and avoid heavy use or harsh cleaning during this period.
