Maintaining your rifle’s barrel is crucial for accuracy, reliability, and extending its lifespan. This guide teaches you how to clean a rifle barrel safely and effectively, covering all the necessary tools, a detailed step-by-step process, and vital tips to ensure your firearm performs at its best. Regular and correct cleaning prevents fouling, corrosion, and preserves your investment.
Are you a proud rifle owner who values precision and longevity? If so, then understanding how to clean a rifle barrel isn’t just a recommendation; it’s an absolute necessity. Whether you’re a seasoned hunter, a competitive shooter, or simply enjoy target practice, maintaining your firearm’s barrel properly is key to its performance and lifespan. A clean barrel isn’t just about aesthetics; it’s about accuracy, reliability, and preserving your investment for years to come.
Many new rifle owners, and even some experienced ones, might feel a bit intimidated by the cleaning process. There’s a lot of information out there, sometimes conflicting, about the “right” way to do things. Don’t worry, we’re here to demystify it all. This comprehensive guide will walk you through everything you need to know about how to clean a rifle barrel, from gathering the right tools to executing each step with confidence. Think of this as your friendly, expert roadmap to a spotless, accurate barrel.
Why Cleaning Your Rifle Barrel Matters So Much
You might be wondering, “Do I really need to clean my rifle barrel *that* often?” The short answer is yes, absolutely. But let’s dive into the “why” a bit deeper. A rifle barrel is a precision instrument, and its internal condition directly impacts how well your rifle shoots.
The Enemy Within: Fouling and Corrosion
Every time you fire a round, tiny particles of carbon from burned gunpowder and traces of copper or lead from the bullet’s jacket or core are left behind in the barrel. This accumulation is known as “fouling.” Over time, this fouling builds up, creating an uneven surface inside the bore. This unevenness can drastically affect the bullet’s flight path, leading to decreased accuracy and inconsistent groupings. Moreover, some gunpowder residues can be corrosive, especially if left for extended periods in humid conditions, potentially leading to pitting and permanent damage to your barrel’s rifling. Learning how to clean a rifle barrel correctly removes these harmful deposits.
Preserving Your Investment
A high-quality rifle is an investment, often a significant one. Just like any other valuable tool or machine, it requires regular maintenance to perform optimally and retain its value. Neglecting to clean your rifle barrel can lead to irreversible damage, reducing its accuracy and potentially rendering it unsafe or inoperable. By consistently practicing proper cleaning techniques, you’re not just maintaining a tool; you’re preserving a legacy.
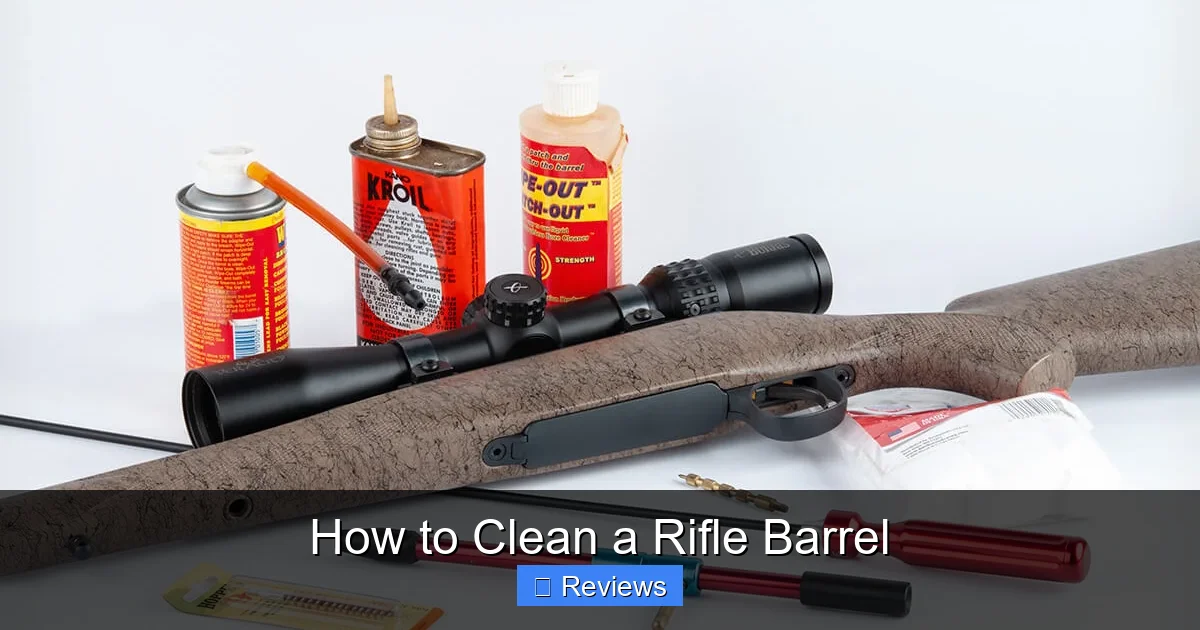
Essential Tools for the Job
Before you even think about touching your rifle, you need to gather the right equipment. Using the wrong tools or low-quality supplies can do more harm than good. Here’s a rundown of what you’ll need to effectively clean a rifle barrel.
The Heart of the Process: Cleaning Rod and Bore Guide
- Cleaning Rod: Opt for a sturdy, one-piece, coated cleaning rod. Plastic or nylon-coated rods are preferred over bare metal ones to prevent scratching the bore. Ensure the rod is long enough for your longest barrel.
- Bore Guide: This is a non-negotiable item. A bore guide inserts into the rifle’s action and aligns the cleaning rod perfectly with the bore, preventing the rod from scraping the chamber or throat. It also helps contain cleaning solvents, keeping them out of the trigger mechanism and stock.
Brushes and Patches: The Scrub and Wipe Duo
- Bore Brushes: You’ll need both a bronze (or copper) brush and a nylon brush of the correct caliber for your rifle. Bronze brushes are excellent for scrubbing out stubborn carbon and copper fouling, while nylon brushes are gentler and good for general cleaning or applying solvents.
- Patches: High-quality cotton or synthetic patches sized correctly for your caliber are essential. They act like tiny sponges, soaking up solvent and wiping away fouling. You might need various sizes depending on how you use them (e.g., wrap around a jag).
- Jags: A jag threads onto the cleaning rod and holds a patch securely, pushing it through the bore. Make sure you have a jag that matches your rifle’s caliber.
- Slotted Tip: An alternative to a jag, a slotted tip holds a patch by folding it through a slot. Some prefer jags for a tighter fit, while others like slotted tips for flexibility.
Solvents and Oils: The Cleaning and Protecting Agents
- Carbon Solvent: This product is designed to break down carbon deposits left by gunpowder.
- Copper Solvent: Specifically formulated to dissolve copper fouling without harming the barrel steel. Many modern “all-in-one” solvents claim to do both, but dedicated solvents often work best for heavy fouling.
- Degreaser (Optional but Recommended): For very dirty barrels, a dedicated degreaser can help lift heavy carbon deposits.
- Gun Oil/CLP (Cleaner, Lubricant, Protectant): After cleaning, you’ll need a light gun oil to protect the bore from rust and corrosion. A CLP product can clean, lubricate, and protect in one step, making it versatile.
Other Handy Accessories
- Gun Vise or Rest: Holds your rifle securely, making the cleaning process much easier and safer.
- Cleaning Mat: Protects your workspace and catches any spills or debris.
- Bright Light Source: A small flashlight or bore light is invaluable for inspecting the barrel’s interior.
- Cotton Swabs and Old Toothbrush: Useful for cleaning nooks and crannies around the chamber and action.
- Safety Glasses and Gloves: Protect your eyes from splashes and your hands from harsh chemicals.
Step-by-Step Guide: How to Clean a Rifle Barrel
Now that you have all your tools, let’s get down to the actual process of how to clean a rifle barrel. Remember, patience and proper technique are your best friends here.
1. Safety First!
This step is paramount and non-negotiable.
- Unload Your Rifle: Visually and physically check that the chamber is empty and the magazine is removed. Repeat this check multiple times.
- Engage the Safety: If your rifle has an external safety, engage it.
- Point in a Safe Direction: Always treat the rifle as if it’s loaded and keep the muzzle pointed in a safe direction.
2. Initial Preparations
- Set Up Your Workspace: Lay out your cleaning mat. Secure your rifle in a gun vise or on a stable rest, ensuring it’s level and accessible.
- Insert Bore Guide: Carefully insert the bore guide into the action of your rifle. This protects the chamber and ensures the cleaning rod travels straight down the barrel.
3. The Solvent Soak and Brushing
This is where the magic begins to happen.
- Apply Solvent: Attach a patch to your jag or slotted tip. Soak the patch thoroughly with carbon solvent.
- First Pass (Wet Patch): Push the solvent-soaked patch slowly and carefully from the breech end (where the bore guide is) through the barrel and out the muzzle. *Never reverse direction in the barrel with a patch or brush – always push completely through and remove before pulling back.* This prevents pushing grime back into the chamber and damaging the muzzle crown.
- Let it Soak: Allow the carbon solvent to sit in the barrel for the recommended dwell time specified by the manufacturer (usually 5-15 minutes). This gives it time to break down carbon fouling.
- Brushing: After the soak, attach a bronze or nylon brush of the correct caliber to your cleaning rod. Dip the brush in carbon solvent. Push the brush through the barrel from breech to muzzle. Once it exits the muzzle, *detach the brush from the rod*. Pull the rod back through the bore, then reattach the brush, re-wet it with solvent, and push it through again. Repeat this process 5-10 times. *Never pull a dirty brush back through the bore from the muzzle end; it can deposit grime back into the barrel or damage the crown.*
4. Patching Out the Grime
Now, it’s time to remove all that loosened fouling.
- First Dry Patches: Attach a clean, dry patch to your jag. Push it through the barrel from breech to muzzle. Remove the patch. You’ll likely see it emerge very dirty.
- Repeat with Dry Patches: Continue pushing clean, dry patches through the barrel until they start coming out less dirty. This might take many patches.
- Copper Solvent Application (If Needed): If your patches still show blue or green streaks (indicating copper fouling), it’s time for copper solvent. Apply copper solvent to a new patch and push it through the barrel. Let it sit for the recommended dwell time (often longer than carbon solvent, sometimes 15-30 minutes, or even longer for heavy fouling, but always follow product instructions).
- Follow with Brushing (If Using Copper Solvent): Some copper solvents recommend light brushing with a nylon brush after soaking. Always check the solvent’s instructions.
- More Dry Patches: After the copper solvent dwell time, again push many clean, dry patches through until they come out clean. You might see more blue/green coming out initially. Continue until patches are white or very light grey.
5. Final Touches: Oiling and Protection
You’re almost done!
- Lightly Oil the Bore: Once the barrel is thoroughly clean and dry (confirmed by pushing a final dry patch that comes out pristine), apply a very light coat of gun oil or CLP. Attach a clean patch to your jag, apply a *single drop* of oil to it, and push it through the bore once. This protects the steel from rust. You want just enough to coat, not to leave excess.
- Clean the Chamber and Action: Use a cotton swab or an old toothbrush with a bit of solvent or CLP to clean around the chamber, locking lugs, and any other accessible parts of the action. Wipe thoroughly with a clean cloth.
- Wipe Down Exterior: Lightly wipe down all external metal surfaces with a cloth lightly dampened with gun oil or CLP to prevent rust.
- Inspect: Use your bore light to visually inspect the barrel from both ends. It should look bright, shiny, and free of any visible fouling or corrosion.
- Remove Bore Guide and Store Safely: Remove the bore guide and ensure your rifle is properly stored according to manufacturer recommendations and local laws.
Advanced Tips and Common Pitfalls
Learning how to clean a rifle barrel properly involves more than just the basic steps. Here are some pro tips and things to watch out for.
Understanding Different Solvents: Copper vs. Carbon
Not all fouling is created equal. Carbon fouling is the black, sooty residue from gunpowder, and it’s best tackled with carbon-specific solvents. Copper fouling, which appears as blue or green streaks on patches, comes from the bullet jacket rubbing against the rifling. It requires a specialized copper solvent to dissolve effectively. Using a dedicated copper solvent is crucial for removing stubborn copper build-up, which can severely impact accuracy. Some “all-in-one” products exist, but for serious cleaning, dedicated solvents are often superior.
The “Break-In” Clean
Many new rifle barrels, especially match-grade ones, benefit from a “break-in” procedure. This typically involves firing a few shots, then cleaning the barrel thoroughly, repeating this cycle for a number of rounds. The idea is to smooth out any microscopic imperfections in the bore, which can trap fouling. Consult your rifle’s manufacturer or a reputable gunsmith for their recommended break-in procedure. During break-in, you’ll be cleaning your rifle barrel much more frequently.
Over-Cleaning is a Real Thing!
While cleaning is essential, it’s possible to overdo it, especially with aggressive brushing or harsh chemicals. Excessive force with a bronze brush, or using a non-coated cleaning rod, can actually wear down the rifling or damage the crown, harming accuracy. Similarly, leaving very aggressive copper solvents in the barrel for too long can etch the steel. Always follow solvent instructions and use appropriate tools and gentle force. A clean barrel is good, but a damaged barrel is never good.
Storing Your Clean Rifle
After all your hard work cleaning your rifle barrel, make sure you store it correctly. Ensure the barrel has a light coat of oil inside and out. Store your rifle in a temperate, low-humidity environment. If using a gun safe, consider a dehumidifier. Avoid storing rifles in soft cases for extended periods, as they can trap moisture and promote rust.
When and How Often Should You Clean?
This is a frequently asked question, and the answer isn’t a simple “every time.”
After Every Range Trip?
For many casual shooters, a quick clean after every range trip is a good habit. This prevents fouling from hardening and becoming harder to remove later. If you’ve only fired a few rounds, a light clean with carbon solvent and patches might be sufficient. If you’ve fired a lot of rounds, or plan to store the rifle for a while, a full deep clean is recommended.
Factors Influencing Cleaning Frequency
- Ammunition Type: Some ammunition leaves more fouling than others. Corrosive ammunition (common with older military surplus) *demands* immediate and thorough cleaning.
- Round Count: The more rounds you fire, the more fouling accumulates.
- Accuracy Requirements: Competitive shooters or hunters who demand peak accuracy will often clean more frequently, sometimes every 10-20 rounds or when they notice accuracy degrading.
- Storage Conditions: If storing your rifle for a long period, a thorough clean and protective oiling are critical.
- Environment: Shooting in dusty, dirty, or humid conditions might necessitate more frequent cleaning.
Ultimately, the best approach is to observe your rifle. If accuracy starts to degrade, it’s definitely time to clean. For general purpose, a good rule of thumb is a thorough clean every 50-100 rounds, or after any significant shooting session, especially if you’re going to store the rifle.
Conclusion
Mastering how to clean a rifle barrel is a fundamental skill for any responsible firearm owner. It’s not just a chore; it’s an act of maintenance that directly impacts the safety, reliability, and accuracy of your rifle. By using the right tools, following a systematic process, and understanding the nuances of fouling and solvents, you’ll ensure your rifle performs flawlessly whenever you need it. Make barrel cleaning a regular part of your shooting routine, and your rifle will reward you with consistent performance and a lifetime of service. Happy shooting, and happy cleaning!
Key Takeaways
- Safety First: Always unload your rifle and point it in a safe direction before starting any cleaning process.
- Use the Right Tools: Invest in a quality cleaning rod, bore guide, patches, brushes (nylon and bronze), appropriate solvents (carbon and copper), and gun oil.
- Clean from Breech to Muzzle: Always push cleaning tools from the chamber end towards the muzzle to protect the crucial crown of the barrel.
- Solvent is Key: Allow solvents adequate dwell time to break down carbon and copper fouling before aggressively brushing.
- Patch Until Clean: Continue pushing dry patches through the bore until they emerge clean, indicating the fouling has been removed.
- Lubricate and Protect: After cleaning, apply a thin layer of gun oil to the bore and external metal surfaces to prevent rust and corrosion.
- Don’t Over-Clean: Excessive or improper cleaning can harm your barrel. Clean based on usage and fouling, not just for the sake of it.
Quick Answers to Common Questions
Question 1?
Should I clean my rifle barrel every time I shoot it? The frequency depends on factors like round count, ammunition type, and accuracy needs. For casual shooters, a light clean after each trip is good; for heavy use, a full clean every 50-100 rounds or when accuracy drops is a good practice.
Question 2?
Is it okay to pull the cleaning brush back through the barrel? No, it’s best practice to push the brush completely through the barrel and then detach it from the rod before pulling the rod back. This prevents dragging fouling back into the bore and protects the sensitive muzzle crown.
Question 3?
What’s the most important tool for cleaning a rifle barrel? A quality, coated, one-piece cleaning rod and a bore guide are arguably the most crucial tools. The bore guide protects the chamber and throat, while the rod prevents damage to the bore and rifling.
Question 4?
How do I know if my barrel is truly clean? Push a final dry patch through the barrel. If it emerges pristine white, with no carbon streaks (black) or copper residue (blue/green), your barrel is likely clean. You can also inspect it with a bore light.
Question 5?
Can I use WD-40 to clean or lubricate my rifle barrel? While WD-40 can displace water, it is not recommended as a primary gun cleaner or lubricant. It can leave behind residues that attract fouling and isn’t designed for long-term corrosion protection or lubrication of firearm mechanisms. Always use dedicated gun cleaning solvents and oils.
🎥 Related Video: How to Clean a Rifle (The Right Way)
📺 Outdoor Life
Here’s the best way to clean a rifle thoroughly but without spending more time and effort than necessary. To make the process …
Frequently Asked Questions
What is the most common mistake people make when cleaning a rifle barrel?
One of the most common mistakes is not using a bore guide, which can lead to scratching the chamber or throat with the cleaning rod. Another frequent error is reversing the cleaning rod or brush inside the barrel, which can damage the rifling and muzzle crown.
How long should I let solvent sit in the barrel?
The dwell time for solvents varies by product and type. Carbon solvents usually need 5-15 minutes, while copper solvents might require 15-30 minutes or even longer for stubborn fouling. Always follow the specific instructions on your solvent’s packaging to avoid damage.
Do I need different solvents for different types of fouling?
Yes, ideally. Carbon solvents are designed for gunpowder residue, and copper solvents specifically dissolve copper buildup from bullet jackets. While some “all-in-one” products exist, dedicated solvents often offer better performance for heavy fouling of each type.
Can over-cleaning damage my rifle barrel?
Absolutely. Aggressive brushing with excessive force, using an uncoated or wrong-sized cleaning rod, or leaving harsh chemicals in the bore for too long can all lead to premature wear, damage to the rifling, or etching of the barrel steel, which degrades accuracy.
What is “barrel break-in” and how does it relate to cleaning?
Barrel break-in is a process, usually for new barrels, involving firing a few shots followed by thorough cleaning, repeated for a number of cycles. The goal is to smooth out microscopic imperfections in the bore. During break-in, you will be cleaning your rifle barrel much more frequently than usual.
Should I clean from the muzzle or the breech?
You should always clean from the breech (chamber end) towards the muzzle whenever possible. This prevents pushing debris back into the rifle’s action and, more importantly, protects the crucial and delicate rifling at the muzzle crown, which is vital for accuracy.


